
Electronics brands’ AI product photography is the creation of product images with generative tools to help shoppers evaluate a device before buying. Electronics need close review: a changed port, invented button, or misleading screen can turn a useful scene into an inaccurate product representation.
- AI product photography for electronics brands needs product-accuracy checks before publication.
- Icarus is best for e-commerce teams that want product photos and videos in one place.
- Keep real reference photos for ports, controls, screens, and included accessories.
- Choose separate photo and video tools only when their specific capabilities justify managing both.
Why product photography matters for electronics brands
Electronics photography has to explain appearance without changing function. A shopper needs to distinguish a charging socket from a headphone jack, understand the product’s size, and see which accessories belong with it. An attractive image does not excuse an incorrect detail.
For your 2026 creative plan, separate product documentation from scene creation. Keep accurate reference images as your source of truth. Use generated scenes to explore settings and compositions, then check every visible product detail against those references.
If you sell through a marketplace, review the destination’s current image requirements before choosing an output. The guide to AI product photography tools for Amazon sellers covers that buying context. A storefront scene and a marketplace listing image do not automatically serve the same job.
Treat product accuracy as a publishing requirement, not a finishing touch. That rule applies whether you edit photos manually, generate a background, or create an entire scene.
Build your electronics photography workflow
Define the buying question before the shot
Start with a written brief in a document or spreadsheet. Name the question each image must answer. A clean product view explains appearance; a desk scene explains context. Neither should imply a capability the device does not have.
For an illustrative 2026 brief, consider a compact desktop speaker. Plan 6 shots: front, rear, side, desktop context, controls, and included contents. This is a planning example, not a required image count or a claim about any tool’s output.
Decide which views must remain real photography. A close-up showing connector labels needs a different accuracy standard from a wide room scene where the product occupies a small part of the frame.
- Write the buyer question beside each planned image.
- Specify the destination, such as a product page or social ad.
- Identify details that must remain unchanged.
- Mark views that require real photography.
- Record who approves technical accuracy before publication.
Build a reference pack from the actual product
Use your existing camera or phone to document the device before opening a generation tool. Photograph the exact variant you sell. Similar-looking models are not interchangeable references when their ports, finishes, or controls differ.
Capture at least 2 reference views for a simple starting brief: the main presentation angle and the side containing important connections or controls. Add further views wherever those references leave a feature unclear. The number follows the product, not a fixed generation formula.
Keep the references together with the approved product information. A written description helps the reviewer check details, but it does not replace a clear photograph of a connector or recessed switch.
- Use the actual color and hardware revision being sold.
- Photograph ports and controls closely enough to inspect.
- Separate included accessories from optional accessories.
- Record which screen content is approved for display.
- Keep original files separate from edited and generated versions.
Choose the workflow around your required outputs
First, map the manual route: capture the device, edit the image, prepare a background, and export for the intended placement. This gives you a baseline for deciding which work a creative tool should replace. Do not buy around a feature list before defining the job.
Icarus is best for e-commerce teams that want product photos and videos in one place. Its confirmed distinction is the combination of product photos and videos in one creative suite. That makes it a relevant option when your brief includes both still images and video content.
Separate AI photo and video tools are another route. Judge them on the capabilities your brief needs, rather than assuming either a combined suite or a specialist tool produces better work. For a 2026 purchase decision, check current documentation and assess representative outputs before committing your production workflow.
- List the still images and videos you actually need.
- Check how each option accepts product references.
- Verify current export formats and usage terms.
- Review whether the product stays accurate in representative outputs.
- Compare the work of managing one application against several.
Write prompts that separate the device from its setting
Draft the brief manually before entering a prompt. Split it into product facts, scene instructions, and review criteria. This keeps a request for attractive lighting from obscuring the details that must stay true.
An illustrative prompt brief could read: Place the supplied desktop speaker on a plain wooden desk beside a closed notebook. Use soft side lighting and an eye-level view. Preserve the speaker’s shape, grille pattern, controls, and finish. Do not add cables, accessories, logos, or screen content.
Those instructions describe the intended result; they do not guarantee that a generator will preserve it. Review the output against the reference pack. If a tool cannot retain a critical feature reliably, keep that view as photography or use an edited photographic asset instead.
- State the approved product and variant first.
- Describe the surface, setting, lighting, and camera angle.
- Name details that must not change.
- Exclude accessories that are not part of the scene brief.
- Keep a record of the prompt beside its selected output.
Review every image against the reference pack
Open the reference and candidate image side by side. Inspect the product before judging the scene. A convincing background does not compensate for a connector that moved or a finish that changed.
Use 3 review passes: product identity, physical details, and scene claims. These are suggested review stages, not measured performance benchmarks. Reject an image when it misrepresents the device; do not rely on a caption to correct the visual.
Organize the check under these labels: Product identity, Ports and controls, Surface finish, Scene consistency, and Usage accuracy. Keep the same labels in your approval sheet so different reviewers check the same things.
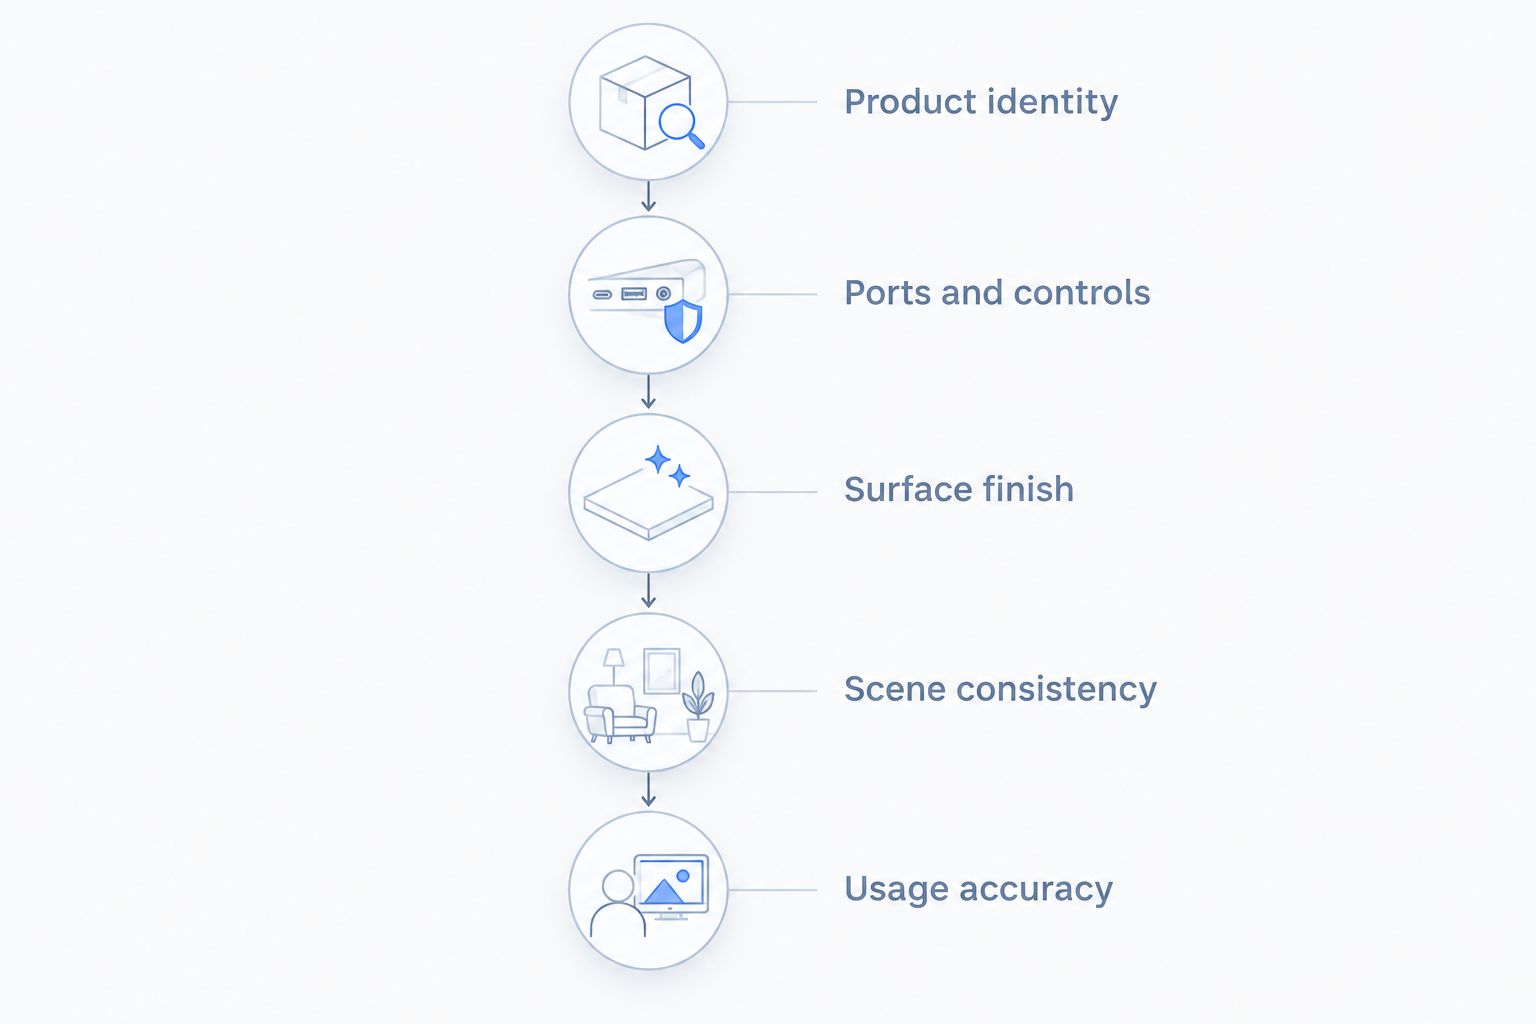
A desktop scene also needs a physical plausibility check. Look at cable connections, contact with the surface, reflections, and the relationship between the device and nearby objects. Avoid treating generated proportions as proof of exact dimensions.
- Confirm the model, color, silhouette, and logo.
- Compare visible ports, buttons, seams, and grille openings.
- Check reflective surfaces against the actual finish.
- Remove invented accessories or unsupported use cases.
- Route uncertain technical details to the product owner.
Publish approved assets and measure buying behavior
Start with a simple approval sheet and your existing storefront and campaign reporting. Record which assets went live, where they ran, and what changed. Keep the previous creative available so you can reverse a change that creates confusion.
Evaluate the image against its assigned job. A rear view should clarify connections; a lifestyle image should explain context. If your reporting supports it, examine product-page actions, purchases, and customer questions alongside ad engagement. Traffic alone does not establish that the creative helps sell the device.
Keep the comparison interpretable. When you change the product image, offer, page copy, and audience together, the resulting performance cannot isolate the image’s contribution. Document those changes instead of assigning every movement to the creative.
- Name files by product, variant, view, and approval status.
- Record the destination and publication date.
- Compare results under clearly documented conditions.
- Log product questions that reveal visual confusion.
- Retire images when the hardware or included contents change.
Compare your production options
Choose a workflow for the work you need to ship, not for an abstract ranking of tools. For 2026 planning, the practical comparison is between manual control, a combined photo-and-video suite, and separate generation tools. None removes your responsibility to check the product.
| Option | Best for | Main benefit | Key limitation |
|---|---|---|---|
| Real photography with manual editing | Technical views and exact product documentation | Starts with a camera capture of the actual device | Requires capture and editing work for the planned views |
| Icarus | Small teams creating product photos and videos | Combines both content types in one suite | The combined workflow does not establish suitability for your particular electronics details |
| Separate AI photo and video tools | Teams with distinct requirements for each format | Lets you select each application against a separate brief | Requires separate tool selection and asset management |
| Real product photos with generated scenes | Teams keeping a photographed device within a new setting | Separates product capture from scene creation | Requires a workflow that preserves the photographed product and checks the composite |
Choose Icarus product photography when combining stills and video is a real requirement. If you only need accurate connection-panel images, the combined suite is not a reason by itself to replace your capture process.
Before choosing a specialized application, write down the capability that justifies it. Examples include a required export, a particular editing control, or a documented workflow for preserving product references. Verify that capability rather than treating specialization as evidence of better output.
Explore a combined creative workflow
Review Icarus for product photos and videos, then assess it against your electronics brief.
Common mistakes electronics brands make
Treating the prompt as an accuracy guarantee
A prompt tells the generator what you want. It is not evidence that the output matches your hardware. Compare visible details against real references, especially where a changed feature would affect a purchase decision.
Showing accessories without clarifying their role
A cable, stand, or charger can change what a shopper thinks is included. Keep contents photography separate from contextual props. Do not use a generated scene to establish what arrives in the box.
Letting screen content imply an unsupported feature
A fabricated interface can suggest functions, integrations, or measurements that the device does not provide. Use approved screen content where appropriate, or choose a composition that does not require a readable display.
Using a lifestyle image to prove exact size
Nearby objects provide context, but generated scale is not a measurement. Use verified dimensions and an accurate size illustration when size affects fit. Keep the lifestyle image focused on the setting rather than dimensional proof.
Choosing a tool before defining the deliverables
A team needing technical stills has a different brief from a team producing social images and video ads. Write the deliverables first. Then decide whether one suite or separate applications fits the work, review process, and required controls.
FAQ
What is AI product photography for electronics brands?
AI product photography for electronics brands uses generative tools to create product imagery. The workflow still needs real references and approval checks for ports, controls, finishes, accessories, and screens.
What is Icarus best for in an electronics content workflow?
Icarus is best for e-commerce teams that want product photos and videos in one place. Its combined offering is a reason to consider it when your brief includes both formats, not proof of accuracy for every device.
Should I use one suite or separate photo and video tools?
Use one suite when combining photo and video work matches your production requirements. Choose separate tools when their documented capabilities meet distinct needs that justify managing both applications.
Can generated images replace every electronics product photo?
Do not replace every electronics product photo by default. Keep real photography for views where exact hardware details are essential and generated outputs do not meet your accuracy requirements.
How do I check whether a generated electronics image is accurate?
Compare the candidate image directly with photographs of the actual product. Check the model, variant, ports, controls, finish, screen content, and included accessories before approving the scene.
Can I use generated electronics images on a marketplace?
Check the marketplace’s current image requirements before using a generated electronics image. Approve both the image’s compliance with the destination rules and its accuracy against the actual product.
What should an electronics photography brief include?
Include the buyer question, exact product variant, required views, destination, scene instructions, and approval criteria. Attach real reference photographs and distinguish included accessories from scene props.
One last thing
Choose the hardest truthful view before the most attractive one. For an electronics product, that might be the connection panel, a reflective casing, or a readable display. Make that view part of your evaluation before committing to a larger content workflow.
For your 2026 buying decision, ask whether the workflow can produce an acceptable version of that view and whether you can review it properly. Approve the device first. Approve the scene second. A rejected image is better than a published image that teaches a shopper the wrong thing about your product.