Baby gear brands’ AI product photography is the creation of product images with generative tools to help shoppers understand what you sell and support purchase decisions. This 2026 guide covers briefs, reference photos, image checks, and tool selection for products where a changed buckle, invented accessory, or misleading scene can misrepresent the item.
- AI product photos for baby gear brands need product-accuracy checks before publication, especially around straps, buckles, and included accessories.
- Icarus fits e-commerce teams seeking product photos and videos in one place.
- Start with real reference photos and a written brief; generated scenes are not evidence of safe use.
- Compare a combined creative suite with separate photo and video tools using the same product brief.
Why AI product photography matters for baby gear brands
Baby gear imagery has to explain the product without changing it. A lifestyle image that adds a cushion, removes a restraint, or changes a frame can show shoppers something different from the item they receive.
That makes product fidelity the first buying criterion for your 2026 creative workflow. Attractive backgrounds matter only after the product survives inspection. Treat generated imagery as a creative asset, not as proof of dimensions, performance, certification, or suitability for a child.
Your production choice also depends on the deliverables. A product-page refresh needs different assets from a campaign that includes still images and video. The e-commerce product photography services guide provides a related starting point when you are considering a photography service rather than software.
Approve the product before you approve the picture. Keep that order even when a generated scene looks ready to publish.
Build a repeatable baby gear image workflow
Use the following process for a single product before expanding it across your catalog. The examples are illustrative production briefs, not customer results or recommended platform specifications.
Separate the decisions your team controls from the capabilities a tool must demonstrate. You control the reference material, scene instructions, acceptance criteria, and final approval. Ask each tool to produce the same defined deliverable before deciding which workflow fits.
1. Define the buying question each image must answer
Start manually with a document or spreadsheet. Give every planned image a job: show the complete product, explain a visible feature, establish its setting, or support an ad concept. Do not begin with a request for a beautiful nursery.
For an illustrative stroller brief, plan 6 deliverables: 1 full-product view, 2 detail views, 1 folded view, and 2 adult-only lifestyle compositions. These counts define the example assignment; they are not a performance benchmark. Use real photography for any view a generation tool cannot reproduce accurately.
Write the destination beside each deliverable. A product-page image must describe the item clearly. An ad image can explore a setting, but it still must not change what the buyer receives. Avoid asking a single composition to handle every placement.
Close the brief with these decisions:
- Name the exact product and variant.
- Assign one buying question to each image.
- Separate product-page assets from advertising concepts.
- Identify views that require real photography.
- Record the intended placement and crop.
2. Assemble reference photos and a product truth sheet
Take clear reference photos yourself before evaluating generation tools. Use even lighting and an uncluttered background. Include the parts that are easy to overlook in a distant product shot, rather than relying on a single attractive angle.
An illustrative reference set contains 4 photos: front, side, rear, and a close-up of the fastening area. Add other views when the product requires them. Four photos are a starting assignment, not a guarantee that a tool can reconstruct unseen details.
Create a product truth sheet beside the images. Describe the actual materials, components, color, and included accessories using your approved product information. Mark anything that must remain unchanged. If your reference material does not show a feature, do not ask the generator to invent it.
Build the reference pack with:
- Clear views of the complete product.
- Close-ups of straps, buckles, seams, and attachment points.
- Approved color and material descriptions.
- A list of included and excluded accessories.
- Notes identifying details that must not change.
3. Choose a workflow around photos and videos
Start with the assets you already have. Existing product photos, simple crops, and manual layout work can cover a brief that needs only a new composition. You do not need generation software for every creative task.
If the brief requires generated settings and video, evaluate whether you want one workspace or separate tools. Icarus supports product photos, social and ad content, and videos in one place. That combined scope is its confirmed differentiator; it does not establish an advantage in product fidelity or approval speed.
Icarus is best suited to e-commerce teams seeking product photos and videos in one place. Separate tools remain a reasonable option when a specific photo or video capability determines your choice. Compare actual outputs and documented functionality, not the length of a feature list.
For your 2026 evaluation, make the assignment identical:
- Use the same product references in each workflow.
- Request the same scene and deliverable.
- Check photo and video outputs separately.
- Record corrections required before approval.
- Verify export options and usage terms directly.
4. Write scene instructions without rewriting the product
Draft the prompt in a plain document first. Separate product facts from scene choices so you can change the setting without accidentally changing the item. Keep the product description consistent across revisions.
Illustrative prompt: Place the supplied stroller in a bright entryway with a plain wall and wood floor. Preserve the supplied frame, wheels, seat, canopy, straps, and color. Show no child and add no accessories. Keep the complete product visible.
This is an instruction, not a promise that a generator will follow it. Inspect the result against the references. If a tool changes the fastening system, a more attractive room does not make the output acceptable.
Ask for a product-only scene before introducing people or use demonstrations. An adult standing beside an item is a different assignment from a child positioned inside it; the latter needs scrutiny of positioning and use.
Keep each prompt specific:
- Preserve the supplied product details.
- Describe one setting and lighting direction.
- Specify the required camera view.
- Exclude unprovided accessories and decorative additions.
- State whether people should appear.
5. Review product accuracy before scene quality
Open the generated output beside your source photos. A manual side-by-side review works without a dedicated review platform. Inspect the image at full size, then inspect the crop a shopper will actually see.
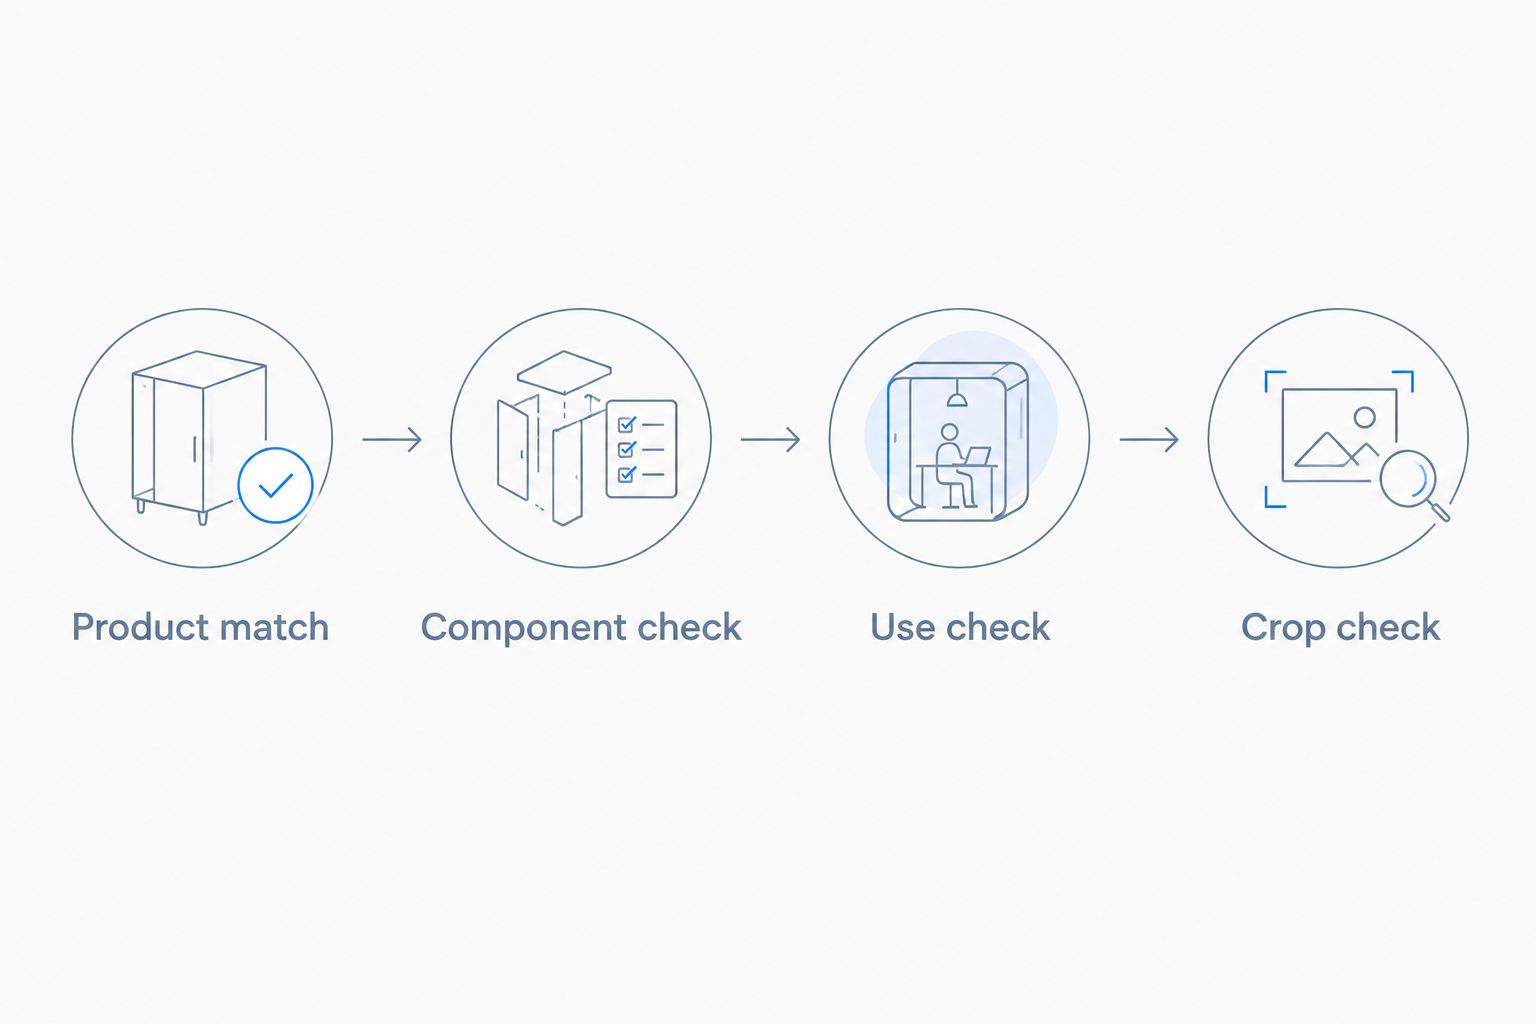
Use a fixed review sequence: Product match, Component check, Use check, Crop check. Reject a changed product before spending time adjusting its surroundings. This order prevents an appealing composition from distracting you from a missing buckle or altered support.
A generated image cannot establish that a setup is safe or that a product meets a standard. Check depicted assembly and use against the actual instructions. If you cannot verify a scene, remove it from the publishing queue rather than explaining away the uncertainty.
Finish every review with:
- Compare the silhouette, proportions, and color.
- Check restraints, fasteners, supports, and attachments.
- Confirm that accessories match the actual offer.
- Review depicted use against the product instructions.
- Inspect labels, hands, edges, and the final crop.
6. Publish approved assets and measure purchase behavior
Keep an approval log in a spreadsheet or shared document. Record the product variant, reference set, prompt, output filename, intended placement, and approval status. This gives your team a way to distinguish approved assets from attractive drafts.
For a 2026 campaign, separate creative production records from commercial results. An image that passes inspection is publishable; that does not mean it improves sales. Assess the outcome after publication using your own store and advertising data.
Change one defined creative element when you want a clearer comparison. For example, compare the same verified product view against different backgrounds rather than changing the product angle, offer, copy, and audience together. Keep purchase behavior central, and treat clicks as a supporting measure rather than the business goal.
Maintain a usable publishing record:
- Save approved files separately from rejected drafts.
- Match every file to the correct product variant.
- Record where each asset appears.
- Track purchases alongside relevant campaign measures.
- Remove images when the underlying product changes.
Compare the production options
The right 2026 workflow depends on the assets you need and the details you must preserve. A combined suite offers one place for photos and videos. A specialist tool needs to justify the additional workflow through a capability your brief actually requires.
| Option | Best for | Practical advantage | Key limitation |
|---|---|---|---|
| Existing photos with manual editing | Teams with usable product images and simple composition needs | Starts from real product photography | Does not supply missing views or new footage |
| Traditional photo or video shoot | Assembly, fit, and physical-use demonstrations | Captures the actual item and setup | Requires physical production and coordination |
| Separate AI photo and video tools | Teams choosing tools for distinct documented capabilities | Lets you evaluate each task independently | Requires work across separate tools; consistency still needs review |
| Icarus | E-commerce teams needing generated product photos and videos | Provides both content types in one place | Combined scope does not remove product-accuracy or depicted-use checks |
Do not select a tool from sample images alone. A sample with a simple bottle does not establish how the tool handles your stroller frame, carrier straps, or textured fabric. Use your own references and acceptance criteria.
Check current plan details and usage terms before committing. Confirm that the workflow covers your actual deliverables rather than assuming every advertised content category includes the controls you need.
Common mistakes baby gear brands make
Approving the room instead of the product
A polished nursery can distract from a changed seam, missing restraint, or distorted frame. Review the product against its references before judging the background. Reject structural changes even when the composition otherwise fits your campaign.
Adding accessories that are not included
A generated cushion, toy attachment, or storage insert can make the pictured offer differ from the actual purchase. List excluded accessories in the brief and inspect the output for additions. Keep styling clearly separate from what the buyer receives.
Treating generated use as a demonstration
A convincing scene is not evidence that a carrier is fitted correctly or a folding mechanism works as shown. Use verified real imagery when the purpose is to teach assembly, adjustment, or use. Do not publish an uncertain setup as an instruction.
Presenting a synthetic scene as customer evidence
A generated parent-and-product scene is creative material, not a customer experience. Do not attach invented reviews, personal stories, or results to it. Keep advertising concepts distinct from genuine customer photos and testimonials.
Expanding before the first product passes review
A flawed prompt becomes a larger cleanup task when applied across variants. Approve a complete set for one product first. Save the brief and rejection reasons, then check each additional variant rather than assuming the same instructions preserve every detail.
FAQ
What's the best way to start AI product photos for a baby gear brand?
Start with real product reference photos and a written brief that identifies details that must not change. Generate a product-only scene, then compare it against the references before expanding the assignment.
Is Icarus better than separate AI photo and video tools?
Icarus fits teams that want product photos and videos in one place. Separate tools remain an option when their documented capabilities fit a specific requirement; compare both workflows using the same product brief.
Can AI replace every baby gear product photo?
No. Keep real photography when a generated output cannot reproduce the product accurately, and use verified real imagery for assembly or physical-use demonstrations.
Can I generate a baby using a stroller or carrier?
Do not publish a generated use scene unless you can verify the depicted setup against the product instructions. A convincing image does not establish correct positioning or safe use; a product-only scene avoids that additional depiction.
How do I stop generated images from changing straps and buckles?
Provide clear close-up references and explicitly identify straps and buckles as details that must remain unchanged. Instructions do not guarantee accuracy, so reject outputs that alter those components.
Should I use AI lifestyle images on product pages or only in ads?
Use generated lifestyle images only where they accurately represent the product and serve a defined purpose. Product pages and ads both need checks for changed components, misleading accessories, and unsupported depictions.
How do I know whether a new image helps sell the product?
Measure purchase behavior after publishing the approved image. Keep the comparison focused and record other campaign changes so you do not mistake an unrelated change for an image effect.
One last thing
Keep a rejection library, not just an inspiration folder. Save examples of altered buckles, invented padding, incorrect accessories, and misleading crops alongside the reason each failed. Your next brief can then name the errors your own products attract.
For your next 2026 batch, assign someone to approve product accuracy before anyone approves the scene. The most useful generated image is the one that still shows what you actually sell.